In the last post, we looked at a method of repairing a bricked EverDrive clone by desoldering and reprogramming the flash memory chip. Now we’re going to dive into the EverDrive code, look at how it marks counterfeit cartridges and figure out how we can recover them… All without touching a soldering iron! In order to get started, we’re going to need two things: the EverDrive firmware file and a Game Boy ROM disassembler, both of which are easy to find online. First, we’ll grab the latest firmware version, v4 from the official Krikzz website. Next we’ll need to download mgbdis, which is available on GitHub. To disassemble the ROM, simply run:
./mgbdis.py GBOS.GB
This generates a disassembly of the GBOS ROM, from which we can start to investigate. Now, this disassembly isn’t perfect; all text and image assets will be treated as code, which will generate some unintelligible instructions, but not to worry. We’ll simply avoid that code and when we assemble it back into a ROM, those instructions will be treated as the data they started as. Neat! Speaking of assembling, if we install rgbds, we can just run:
cd disassembly && make
To rebuild the ROM. To make things a little easier on myself, I opened the ROM in a hex editor and found the offending string: “Authentication error”, I then created a GBOS.sym file and entered the location of this string into it, so mgbdis would know to treat it as text and we can locate it easily in the disassembly:
00:0804 Authentication_Error
00:0804 .text:14
Now all we need to do is search the disassembly for Authentication_Error and we’ll get straight to the relevant code.
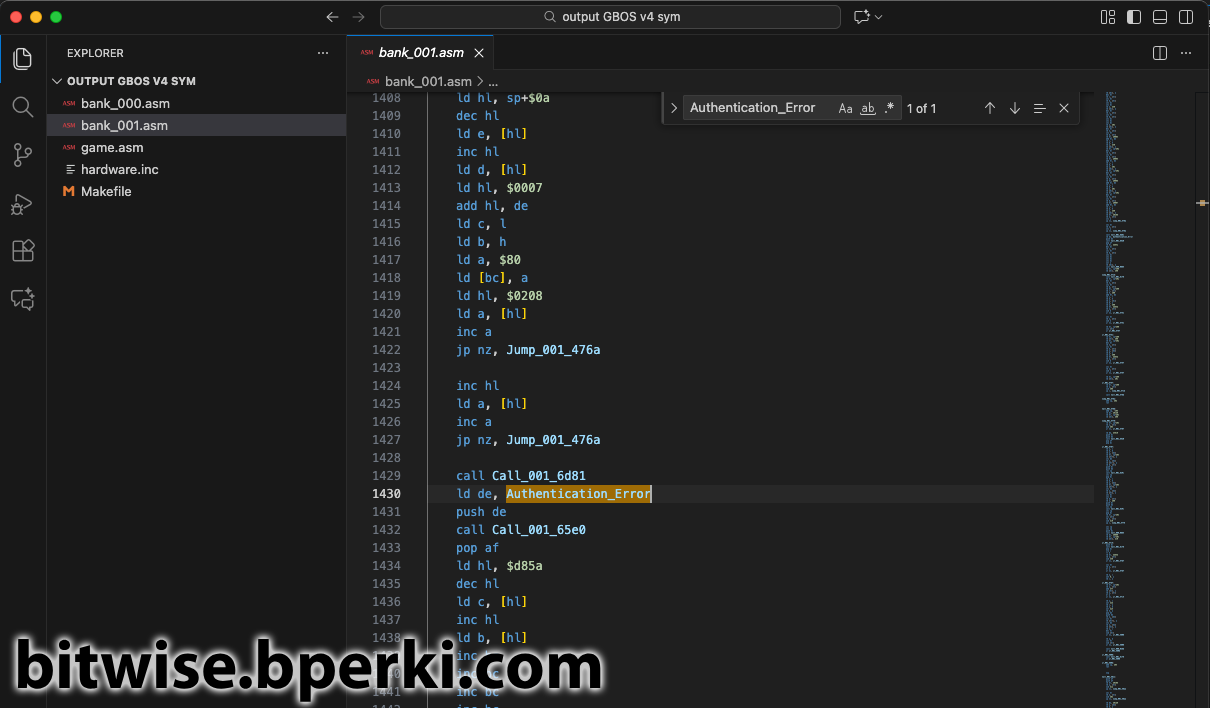
Looking just above the Authentication_Error message is where we’ll find the important bits, I’ve commented it below:
ld hl, $0208 ; Load the value 0x0208 into the register hl
ld a, [hl] ; Load the memory at 0x0208 into the register a
inc a ; Increment a by 1
jp nz, Jump_001_476a ; If a + 1 != 0, jump to code at 0x476A

inc hl ; Increment the register hl (now contains 0x0209)
ld a, [hl] ; Load the memory at 0x0209 into the register a
inc a ; Increment a by 1
jp nz, Jump_001_476a ; If a + 1 != 0, jump to code at 0x476A
Looking at the dump of my real EverDrive, I can see that 0x0208 and 0x0209 match the values of my cartridge’s serial number. The rest of the code checks if they are equal to 0xFF (0xFF + 1 == 0 in 8-bit arithmetic). If either byte differs from 0xFF, then we jump to another area of the code and skip over the “Authentication error” message. Aha! So in a counterfeit cartridge, the serial number gets marked as 0xFFFF and this is then used to display the error message. In order to work around this, we want to jump to 0x476A regardless of the state of the serial number. This couldn’t be easier; simply change jp nz to jp. jp nz stands for “jump if the previous operation was not zero” and jp just stands for “jump (always)”. By replacing these two commands, we can rebuild the ROM to create a patched version that will never show the “Authentication error” message. But what good does this do us if the cartridge is already bricked? Good question! For that, we’ll need to break out a cartridge programmer and re-flash this newly-patched ROM into the top 32kB of flash memory.
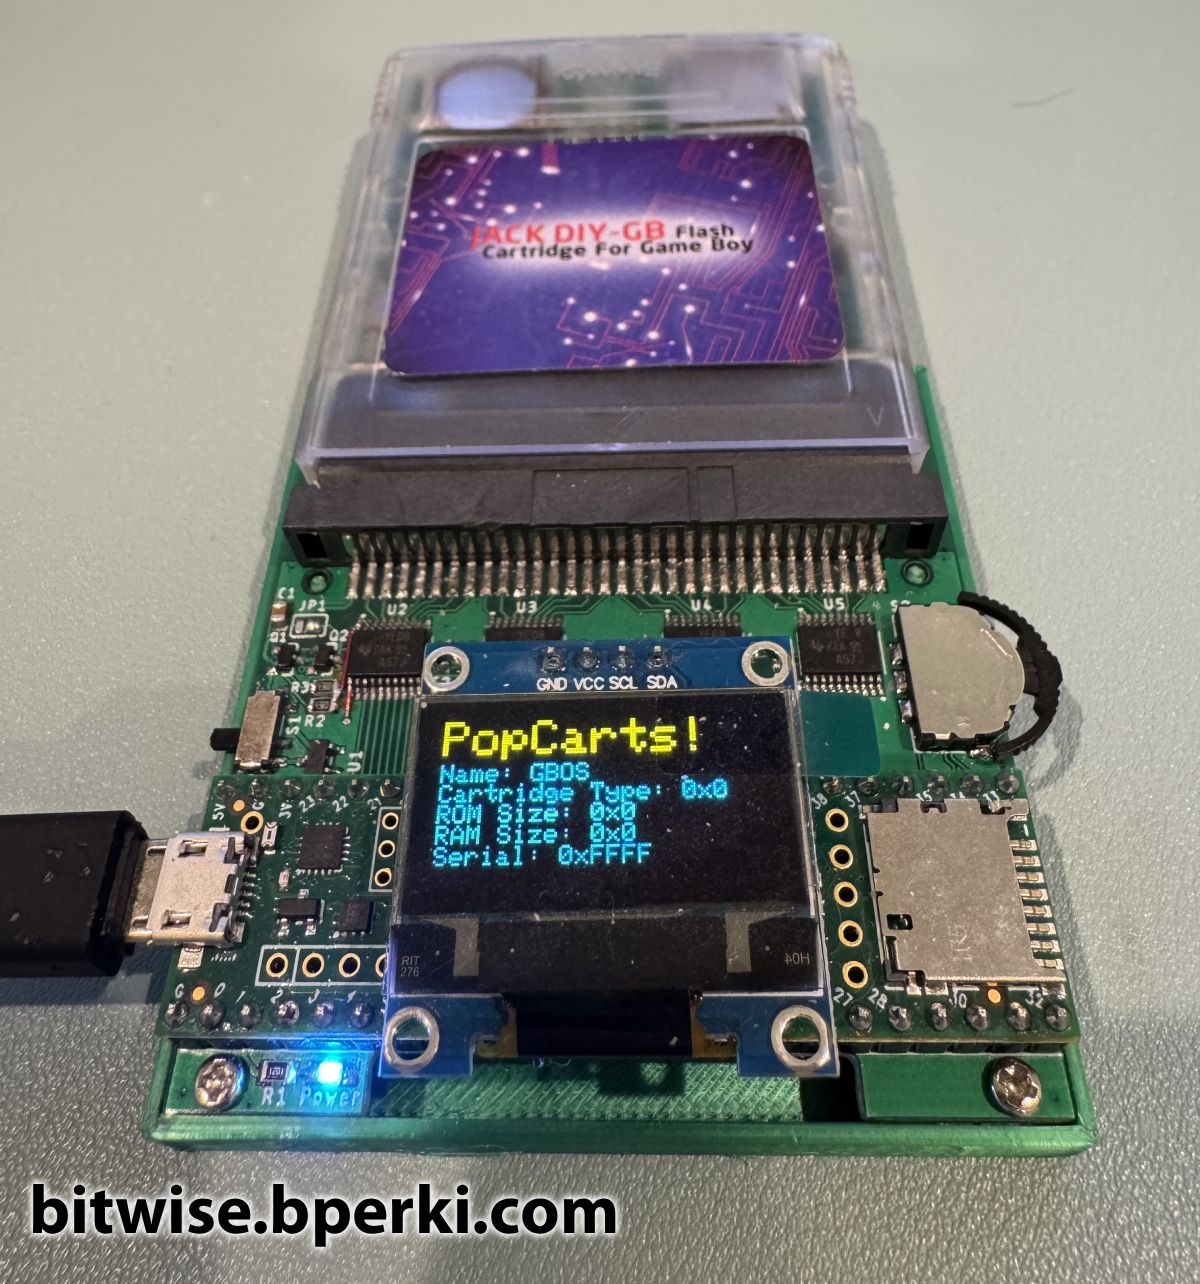
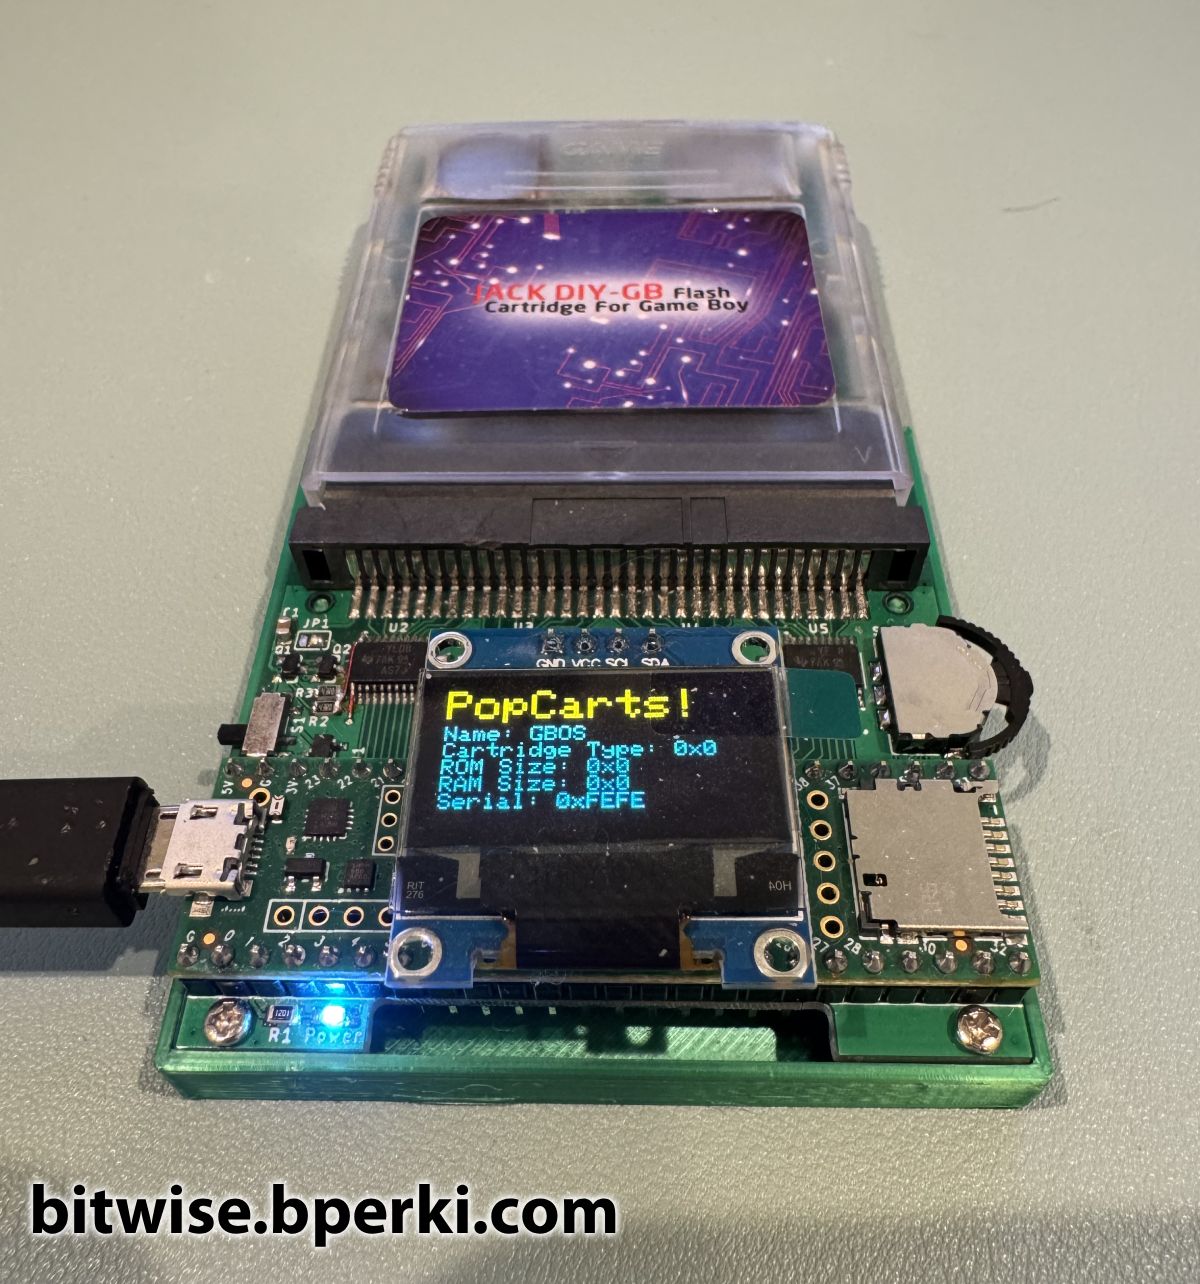
Reading the ROM from flash was trivial – even though it’s located at 0x7F8000 which is outside the address range that could be reached with just 16 address bits on the Game Boy cartridge. When powered up, the CPLD acting as a Memory Bank Controller (MBC) in the EverDrive defaults to setting the higher address bits on flash chip, so reading byte 0x0000 actually maps to reading from 0x7F8000, exactly what we want. I wrote a quick program to display some known values from the Game Boy cartridge – the name of the ROM, the cartridge type, ROM size, RAM size and the all important serial number bits. This gave me a great jumping-off point to start tinkering.
Before reprogramming the whole flash, I wanted to try something simpler: just reprogramming the two serial number bytes. Since the chip is NOR flash, we can change a 1 to a 0 easily (to go from a 0 to a 1, you must erase a whole block, which sets every byte in that block back to 0xFF). Fortunately, since the serial numbers are 0xFF, they are all 1s, so it would be easy to simply give them a new value and issue the write command… Right?
This is where I got stuck for awhile, pouring over the datasheet for the M29W640FT flash chip and reading about CFI (Common Flash memory Interface) commands. On this chip, to write a byte to memory, you needed to write the following sequence of command bytes:
Write 0xAA to 0x0AAA
Write 0x55 to 0x0555
Write 0xA0 to 0x0AAA
Write DATA to ADDRESS
Where DATA is the byte you want to write and ADDRESS is the address you want to write to. This should have been straight-forward, but for some reason nothing was writing, no matter how many times I tried this. It worked fine when I tried to write to a generic flash cart, it was just the EverDrive that wouldn’t write. Eventually, I broke out my multimeter and started probing pins on the flash chip. I was surprised to see that even though I was toggling the !WR pin on the cartridge, the !WR pin on the flash chip was staying high (disabled) the entire time. That’s no good, because in order to latch write commands to the flash chip, you need to pull !WR low for a short period of time. I traced out the connections on the cartridge and found that the cartridge !WR pin and the flash !WR pin were not directly connected to each other. Both simply went into the CPLD, where any logic could be happening, leaving me stumped as to how to move forward.
Then it hit me; the EverDrive knows how to program itself, that’s what it does when you load up a game. So all I had to do was jump back into the disassembled code, find where it writes to the flash and mimic what it was doing. Searching for the addresses $0555 and $0AAA led me right to where I needed to look.
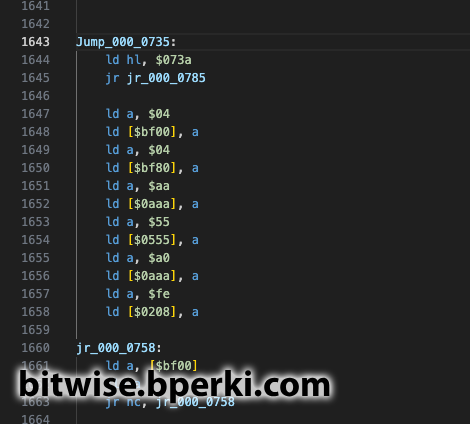
Here we see a sequence writing a byte to the flash. Amazingly, this particular sequence is changing the first byte of the serial number from 0xFF to 0xFE, which would get around the “Authentication error”, as we saw earlier. I was never able to figure out when or how this particular code was called, but it does appear there may be a built-in way to un-brick the cartridges. Maybe I’ll put some more time into poking at that later. But for now, this gives us another big hint. Before writing a byte to flash, two bytes are written to RAM; 0x04 is written to 0xBF00 and then to 0xBF80. So let’s add that to the PopCarts code and see what happens.
Success! When these two bytes were written, the cartridge !WR pin and the flash !WR pin get tied together, so now we have the ability to write data to the chip. The first test was changing the serial number to 0xFEFE, which was enough to unlock the cartridge again.
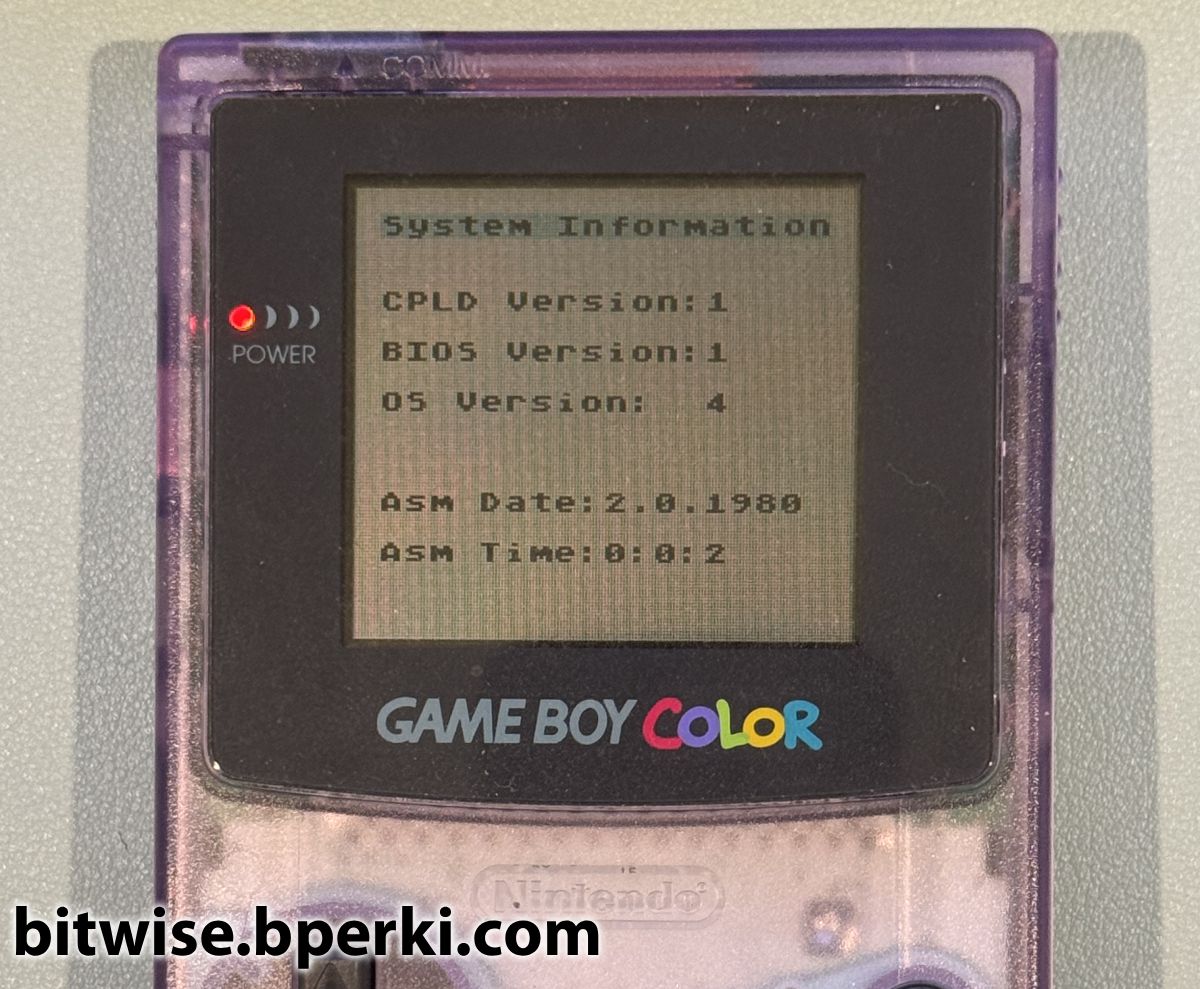
Finally, now that we have the ability to write bytes to the flash, all that’s left to do is erase the top 32kB of the chip and write the newly-patched firmware in its place. As we can see, the previously-bricked cartridge is now working just fine, and the firmware is now on the latest, version 4.
Finally! I had figured out a way to recover a bricked EverDrive clone without any soldering required. The one thing that still bugged me, though, was that this method still required a custom-made cartridge programmer to work. I knew that the EverDrive was capable of reprogramming itself, so it seemed like there should be a way to un-brick them without the need for a cartridge programmer. It should be possible to write a Game Boy ROM that uses the EverDrive to fix itself. But since the bricked cartridges lock themselves up before they load and execute any ROM files, this method seems impossible. Or is it? Head over to part 3 to learn how to work around this!